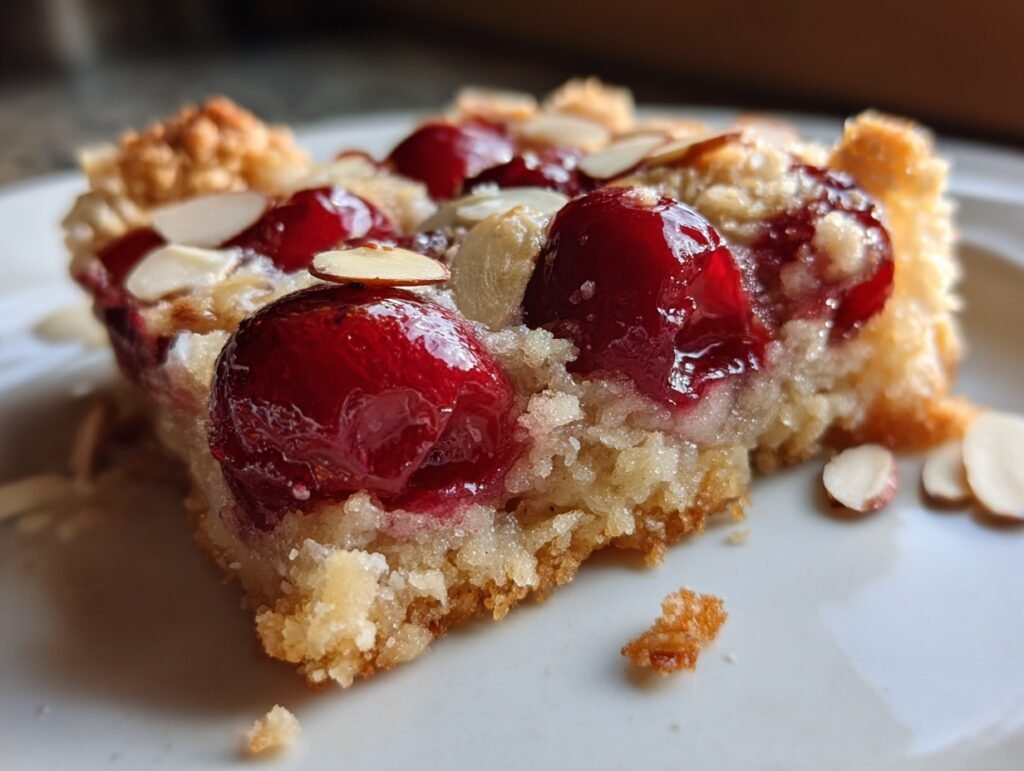
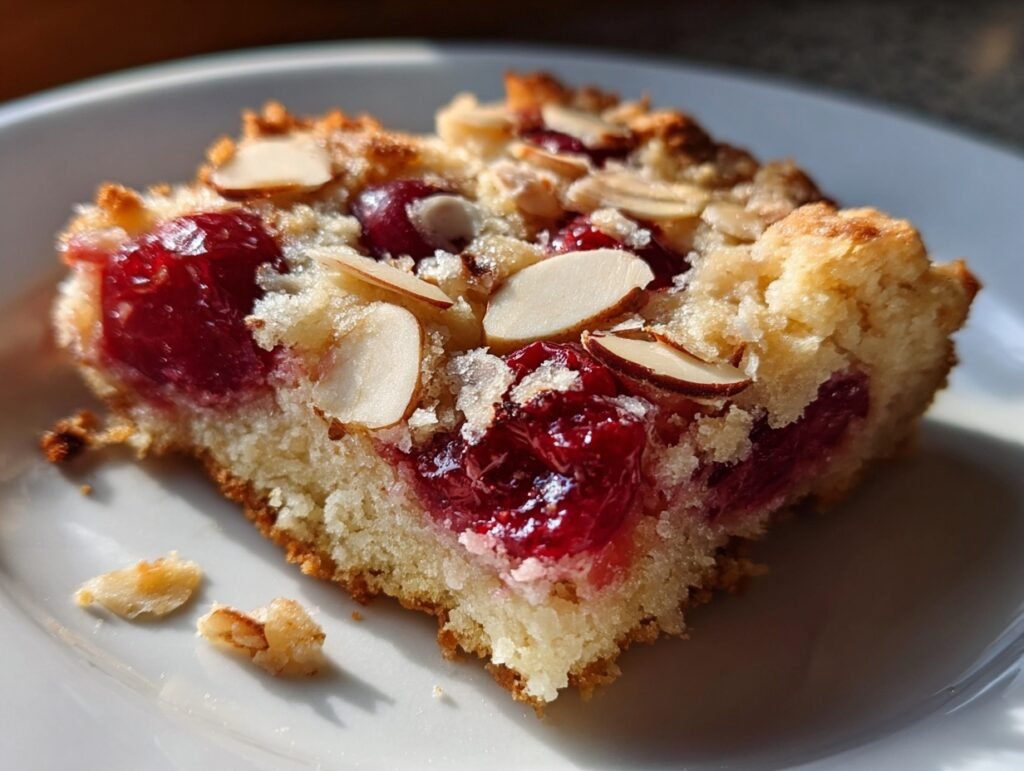
There’s something utterly irresistible about biting into a warm Easy Cherry Almond Bars where the buttery almond crust gives way to glistening, jewel-toned cherries bubbling beneath a golden almond topping. The scent of toasted almonds and sweet-tart fruit fills your kitchen like a summer afternoon at the orchard, while each square delivers that perfect balance of crisp edges, jammy centers, and delicate vanilla notes that make you reach for just one more. Easy Cherry Almond Bars capture everything we love about stone-fruit season in one beautiful, handheld treat that looks as stunning as it tastes.
These bars practically beg to be photographed—the deep crimson cherries peeking through toasted almonds create instant visual drama against the pale golden crust. Whether you’re hosting a backyard gathering or simply want something special to enjoy with afternoon coffee, Easy Cherry Almond Bars deliver that polished, bakery-style presentation with surprisingly little effort. The recipe feels made for Pinterest boards: vibrant colors, clean lines, and that effortless elegance that makes everyone ask for the link.
Discover more summer dessert inspiration while you bake these beauties and watch your feed light up with saves.
Why You’ll Love This Recipe
Easy Cherry Almond Bars come together in one bowl for the crust and one saucepan for the filling, making them perfect for busy summer days when you still want something impressive. The short ingredient list means you can pull them together without a special shopping trip, yet the finished bars look like they came from a high-end patisserie.
Beyond the convenience, these bars travel beautifully to potlucks and picnics, slice cleanly for gifting, and earn endless compliments from everyone who tries them. The combination of buttery almond crust, bright cherry filling, and crunchy topping creates a texture and flavor experience that feels both nostalgic and fresh—exactly the kind of recipe you’ll want to make again and again.
Ingredients
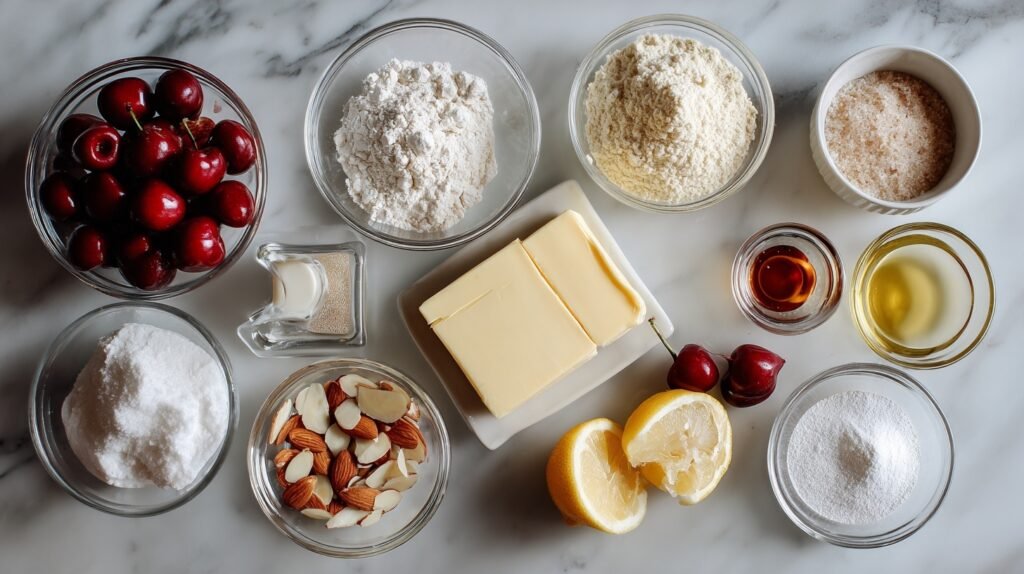
The beauty of Easy Cherry Almond Bars lies in how each ingredient plays a distinct role: almond flour adds delicate nuttiness and tenderness to the crust, while fresh cherries bring natural sweetness and vibrant color. Cornstarch thickens the filling into a glossy, sliceable layer, and lemon juice keeps everything bright. Brown sugar in the topping creates caramelized edges that contrast beautifully with the pale almonds scattered across the top.
– 1 1/2 cups all-purpose flour
– 1/2 cup almond flour
– 1/2 cup unsalted butter, softened (or plant-based butter)
– 1/4 cup granulated sugar
– 1/4 teaspoon salt
– 1 teaspoon vanilla extract
– 2 cups fresh cherries, pitted and halved
– 1/2 cup sliced almonds
– 1/4 cup brown sugar
– 1 tablespoon cornstarch
– 1 tablespoon lemon juice
Quick Overview
Prep Time: 20 minutes
Cook Time: 35 minutes
Total Time: 55 minutes
Servings: 16 bars
Difficulty Level: Easy
Easy Cherry Almond Bars require minimal equipment—just a mixing bowl, saucepan, and 8×8 baking pan—making them ideal for weeknight baking or last-minute entertaining. The straightforward process yields professional-looking results that feel far more time-intensive than they actually are.
Step-by-Step Instructions

These clear, confidence-building steps will guide you to perfectly set, golden Easy Cherry Almond Bars every single time. Each stage builds flavor and texture while keeping the process simple and approachable.
1. Preheat your oven to 350°F and line an 8×8-inch baking pan with parchment paper, leaving an overhang on two sides for easy removal later.
2. In a medium bowl, cream together the softened butter, granulated sugar, and vanilla extract until the mixture looks light and fluffy, about 2 minutes.
3. Add the all-purpose flour, almond flour, and salt to the butter mixture. Stir with a wooden spoon or spatula until a soft, slightly crumbly dough forms and no dry streaks remain.
4. Press two-thirds of the dough evenly into the bottom of your prepared pan, creating a smooth, level base that reaches all four corners.
5. In a small saucepan, combine the pitted and halved cherries, lemon juice, and cornstarch. Cook over medium heat, stirring gently, until the cherries release their juices and the mixture begins to bubble and thicken, 4–5 minutes.
6. Remove the cherry filling from the heat and let it cool for 5 minutes so it won’t melt the crust when spread.
7. Spread the warm cherry mixture evenly over the crust layer, making sure the fruit reaches the edges for uniform bars.
8. In a small bowl, mix the remaining one-third of the dough with the sliced almonds and brown sugar until the almonds are evenly coated and the mixture resembles coarse crumbs.
9. Sprinkle the almond topping generously over the cherry layer, covering most of the surface while allowing a few cherries to peek through for visual appeal.
10. Bake for 32–35 minutes, or until the topping turns deep golden brown and the cherry filling bubbles gently around the edges.
11. Remove the pan from the oven and place it on a wire rack. Let the Easy Cherry Almond Bars cool completely in the pan, about 1 hour, so the filling can set properly.
12. Use the parchment overhang to lift the cooled slab onto a cutting board, then slice into 16 neat squares with a sharp knife.
Pro Tips for Perfect Results
Master these small details and your Easy Cherry Almond Bars will look and taste bakery-fresh every time. Each tip targets texture, flavor balance, or presentation so you can achieve consistent success.
Chill the dough for 10 minutes before pressing it into the pan if your kitchen is warm—this keeps the butter from melting and ensures a crisp base.
Toast the sliced almonds in a dry skillet for 2–3 minutes before adding them to the topping; the extra nutty aroma elevates the entire bar.
Drain any excess liquid from the cherry mixture if it seems very runny after cooking; a thicker filling prevents soggy bottoms.
Use room-temperature butter for the crust so it creams smoothly without curdling or separating.
Press the crust firmly and evenly so there are no thin spots that could crumble when you slice the finished bars.
Scatter a few extra almond slices on top during the last 5 minutes of baking for added crunch and visual contrast.
Let the bars cool fully before cutting—patience here guarantees clean edges and picture-perfect squares that hold their shape.
Serving Ideas & Variations
Picture these Easy Cherry Almond Bars arranged on a white marble platter with fresh cherry stems still attached for a dramatic centerpiece at any summer gathering. The deep red fruit against golden crust photographs beautifully in natural light, making them ideal for both casual brunches and elegant dessert tables.
Pair a chilled square with a scoop of vanilla bean ice cream for a warm-and-cold contrast that feels indulgent yet refreshing. For a more sophisticated presentation, dust the tops lightly with powdered sugar and serve alongside espresso or iced tea garnished with mint sprigs.
Swap the cherries for an equal amount of pitted apricots or peaches when stone-fruit season shifts, or add a handful of blueberries for a patriotic red-white-and-blue version perfect for holiday weekends. A light drizzle of melted white chocolate over the cooled bars adds extra elegance without complicating the recipe.
Nutritional Highlights
Easy Cherry Almond Bars deliver a satisfying mix of whole-food ingredients that feel both wholesome and indulgent. Cherries contribute antioxidants and vitamin C, while almond flour brings healthy fats and vitamin E. The moderate sugar content keeps them dessert-appropriate without overwhelming sweetness.
Per serving (1 bar): approximately 165 calories, 3g protein, 19g carbohydrates, 9g fat, 2g fiber. These values make the bars a reasonable treat that still leaves room for seconds.
Storage Made Simple
Easy Cherry Almond Bars store beautifully, so you can bake a batch on Sunday and enjoy them throughout the week. Proper storage preserves both texture and flavor so every bite tastes as fresh as the first.
Once completely cooled, store the cut bars in an airtight container at room temperature for up to 2 days or in the refrigerator for 3–4 days. Separate layers with parchment paper to prevent sticking. For longer storage, wrap individual bars tightly in plastic wrap, place them in a freezer-safe bag, and freeze for up to 2 months. Thaw overnight in the refrigerator before enjoying. To restore crisp edges, warm refrigerated or thawed bars in a 300°F oven for 5–7 minutes.
FAQs
Can I use frozen cherries instead of fresh? Yes, simply thaw and drain them well before cooking to avoid excess liquid in the filling.
How far ahead can I make Easy Cherry Almond Bars? The bars taste best within 2 days but can be baked up to 4 days in advance and stored in the refrigerator.
My filling seems too runny—what went wrong? Be sure to cook the cherry mixture until it bubbles and visibly thickens; if it’s still loose, simmer 1–2 minutes longer.
Can I make these bars gluten-free? Substitute a 1:1 gluten-free all-purpose blend for the regular flour; the almond flour already helps with tenderness.
What’s the best way to pit fresh cherries quickly? A handheld cherry pitter or the tip of a sturdy straw both work efficiently and keep juice contained.
Can I double the recipe? Absolutely—use a 9×13-inch pan and increase baking time by 8–10 minutes, watching for the same golden-brown topping.
Do the bars need to be refrigerated? They keep well at cool room temperature for 2 days; beyond that, refrigeration is recommended to maintain freshness.
Final Thoughts
Easy Cherry Almond Bars prove that stunning summer desserts don’t have to be complicated. With their jewel-toned cherries, buttery almond crust, and crunchy topping, they’re the kind of treat that earns a permanent spot in your recipe collection. Bake a batch today, snap those vibrant photos, and watch your Pinterest saves climb. Pin this recipe now so you can return to it whenever stone-fruit season calls, and share the link with friends who need a little summer sunshine in their baking.